How to Tie Fishing Knots: 5 Essential Knots Every Angler Needs
 Ask any experienced angler about fishing fundamentals and knots will be near the top of the list. Your knot is the only thing connecting you to the fish — a weak knot means lost fish and lost tackle.
The good news? You don’t need to learn dozens of knots. Five will cover virtually every situation you’ll encounter in freshwater fishing. Master these five, and you’ll fish with confidence knowing your connections will hold.
Why Knots Matter More Than You Think
Here’s something that might surprise you: a poorly tied knot can reduce your line’s strength by 50% or more. That 8 lb line you’re using? With a bad knot, it might only hold 4 lbs before failing.
Most “the fish broke my line” stories are actually “my knot failed” stories. The line rarely breaks mid-section — it almost always fails at a poorly tied knot.
The knots in this guide, when tied correctly, retain 90-95% of your line’s rated strength. That’s the difference between landing fish and telling stories about the one that got away.
The Five Essential Fishing Knots
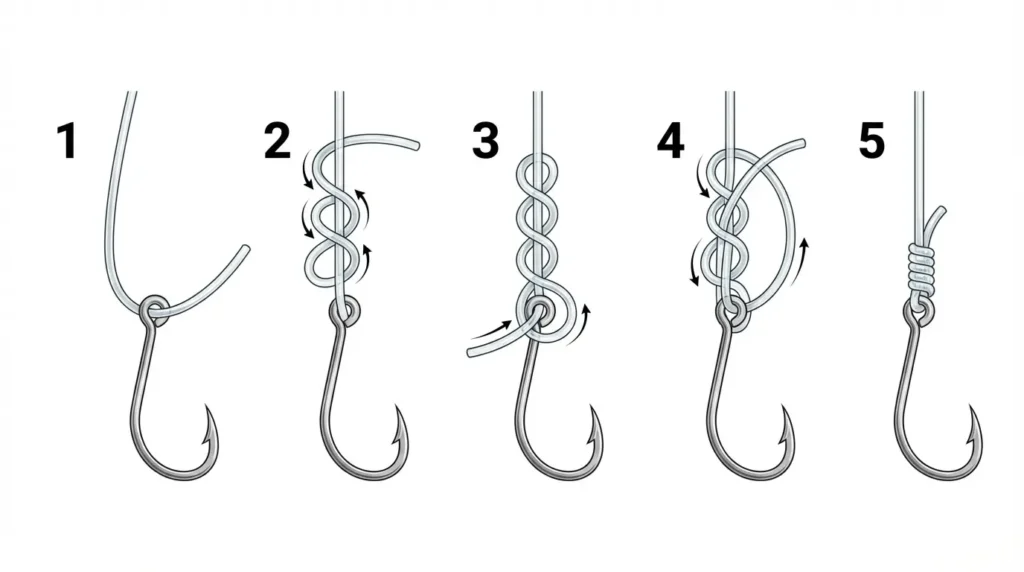
1. The Improved Clinch Knot
Use for: Attaching line to hooks, lures, and swivels — the most common connection you’ll make
Works best with: Monofilament and fluorocarbon line
Strength: Approximately 95% when tied correctly
 How to tie it:
- Thread 6 inches of line through the hook eye
- Double back and wrap the tag end around the standing line 5-7 times
- Pass the tag end through the small loop formed just above the hook eye
- Pass the tag end through the large loop you just created (this is the “improved” part)
- Moisten the knot with saliva or water
- Pull the tag end to tighten the coils, then slide the knot tight against the hook eye
- Trim the excess tag end to about 3mm
Common mistakes: Skipping step 4 (passing through the second loop), not moistening before tightening, using too few wraps, and allowing coils to overlap.
Important warning: This knot performs poorly with braided line — avoid using it with braid.
2. The Palomar Knot
Use for: Attaching line to hooks, lures, swivels, and jigs — one of the strongest and most reliable knots
Works best with: Braided line (excellent), also good with mono and fluoro
Strength: Up to 95% with mono, over 100% efficiency with braid
 How to tie it:
- Double about 6 inches of line to form a loop
- Pass the loop through the hook eye
- Tie a simple overhand knot with the doubled line, leaving the hook hanging loose
- Pass the loop completely over the hook
- Moisten thoroughly
- Pull both the standing line and tag end slowly and evenly to tighten
- Trim excess
Why it’s excellent: The Palomar can be tied in complete darkness once you’ve practiced. The doubled line provides extra strength, and it works brilliantly with slippery braided lines where other knots fail.
Common mistakes: Not passing the loop fully over the hook, tightening unevenly (creates a weak point), and not leaving enough doubled line at the start.
3. The Uni Knot (Hangman’s Knot)
Use for: All-purpose terminal knot for hooks, lures, and swivels — extremely versatile
Works best with: All line types (mono, fluoro, and braid with extra wraps)
Strength: Approximately 90%+ with most lines
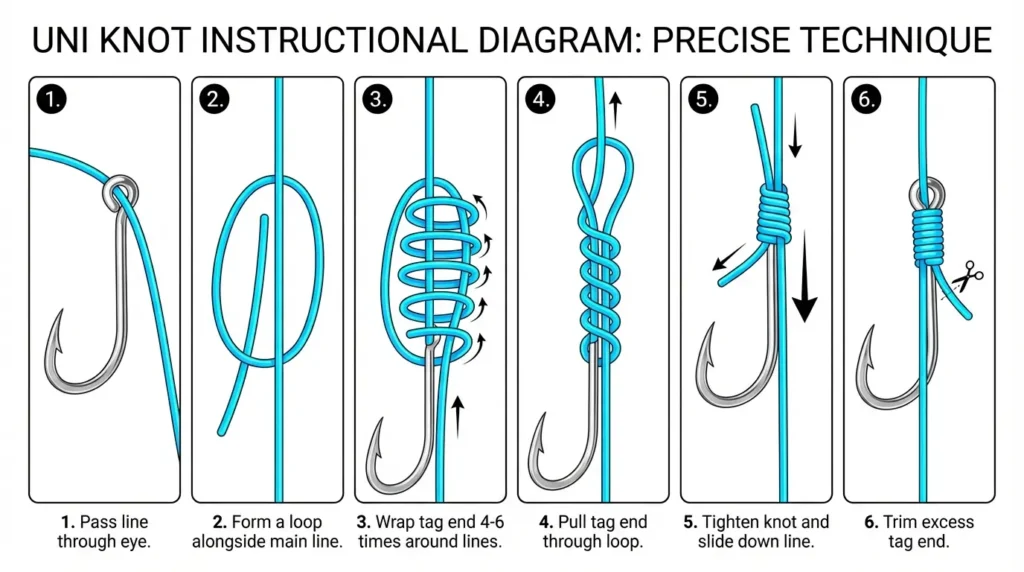 How to tie it:
- Pass the line through the hook eye and pull 6 inches through
- Bring the tag end back parallel to the standing line, forming a loop
- Wrap the tag end around both lines and through the loop 5-7 times (use 7+ for braid)
- Moisten the knot
- Pull the tag end to partially tighten the coils
- Slide the knot down to the hook eye by pulling the standing line
- Trim excess
Why it’s useful: The Uni is the Swiss Army knife of fishing knots. Once learned, the same basic technique adapts to joining two lines (Double Uni), creating loops, and more.
4. The Double Uni Knot (Line-to-Line)
Use for: Joining two lines together — perfect for attaching a leader to your main line
Works best with: Joining lines of similar or different materials and diameters
Strength: Approximately 90% of the weaker line’s strength
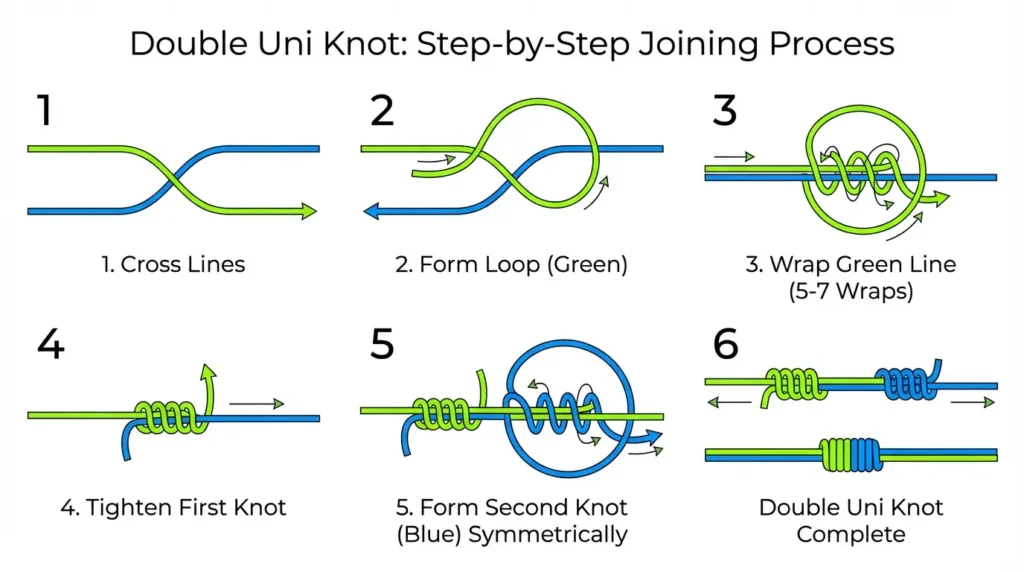 How to tie it:
- Overlap the ends of both lines by about 6 inches
- With the first line’s tag end, form a loop and wrap through it 5-6 times around both lines
- Pull tight
- Repeat with the second line’s tag end, wrapping in the opposite direction
- Pull tight
- Moisten both knots
- Pull the standing lines in opposite directions to slide the knots together
- Trim both tag ends
When you’ll use this: Attaching fluorocarbon leader to braided mainline is the most common application. The knot passes through rod guides smoothly.
5. The Loop Knot (Rapala Knot)
Use for: Attaching lures that need freedom to move naturally — crankbaits, jerkbaits, topwater lures
Works best with: Monofilament and fluorocarbon
Strength: Approximately 83-85%
 How to tie it:
- Tie a loose overhand knot about 3 inches from the tag end
- Pass the tag end through the lure’s eye
- Bring the tag end back through the overhand knot (same side it exited)
- Wrap the tag end around the standing line 3-5 times above the overhand knot
- Pass the tag end back through the overhand knot
- Pass the tag end through the new loop created above
- Moisten and tighten gently
Why use a loop: A fixed knot restricts how a lure can move. The loop allows the lure to swing freely, giving it more natural action — especially important for lures designed to dart, wobble, or walk.
Critical Knot-Tying Tips
Always Moisten Your Knots
This isn’t optional. When you tighten a dry knot, friction generates heat that weakens the line. Saliva works fine — just wet the knot before pulling tight. This single habit will prevent more knot failures than any other tip.
Use the Right Number of Wraps
- Monofilament: 5-6 wraps minimum
- Fluorocarbon: 5-6 wraps
- Braided line: 7-8+ wraps (braid is slippery and needs more friction)
Trim Tag Ends Properly
- Mono/Fluoro: Trim to 2-3mm
- Braided line: Leave 5-6mm — braid is slippery and short tags can pull through
Test Every Knot
Before casting, give your knot a firm pull. It’s better to discover a problem on the bank than when a fish is running.
Choosing the Right Knot for Your Line Type
| Line Type | Best Knots | Avoid |
|---|---|---|
| Monofilament | Improved Clinch, Palomar, Uni | — |
| Fluorocarbon | Palomar, Uni, Improved Clinch | — |
| Braided | Palomar (doubled), Uni (7+ wraps) | Improved Clinch (slips badly) |
Common Knot-Tying Mistakes
Not wetting the knot: Causes friction heat that weakens line. Always moisten.
Insufficient wraps: Fewer wraps = less friction = knots that slip. Use at least 5-6 for mono, 7+ for braid.
Messy, overlapping wraps: Coils should sit neatly beside each other. If they overlap or look wrong, cut it off and retie.
Pulling too fast: Tighten slowly and evenly. Quick jerks cause uneven tension and weak spots.
Wrong knot for the line: The Improved Clinch with braid is a guaranteed failure. Match your knot to your line type.
Not pulling tight enough: A knot that slips even slightly under pressure will fail when it matters. Snug it firmly.
Practice Makes Permanent
Here’s the best tip for learning knots: practice at home, not on the water. Grab some spare line and a hook (or a key ring), sit in front of the TV, and tie 20 of each knot.
The goal is muscle memory. When you can tie these knots in poor light, with cold hands, without thinking, you’ve got them. That confidence translates directly to more fish landed.
Final Thoughts
Five knots. That’s all you need to fish effectively for years. The Improved Clinch for everyday hook and lure connections, the Palomar for braided line and reliability, the Uni for versatility, the Double Uni for leaders, and the Loop Knot for lures that need to swim freely.
Master these five, and you’ll have confidence in every connection you make. Your gear becomes an extension of your intent rather than a weak link waiting to fail.
Pre-Rigged and Ready
While you’re learning knots, our Kids Fishing Starter Kit comes with pre-tied rigs and pre-spooled line so you can start fishing immediately. Perfect for getting on the water while you build your knot-tying skills at home.
